It’s Time to Spice Things Up

Living simply takes on many different forms in our lives.  Lately it has been about removing things from our diets and lives that masquerade as something else entirely.  Let me tell you about some things we always do… We always cook with grass fed beef.  We always grow heirloom/organic/gmo free veggies without chemicals…. We always buy dairy products that are hormone free.  However, we have started to take a closer look to the things we add to our food.  Most recently it was taco seasoning.

Once upon a time people used pure herbs and spices to flavor their food.  Now, store-bought  seasonings are one of the more deceptive things we add to our food.  If you look closely at the ingredients in your favorite taco seasoning, you will notice several items that are neither spice nor herb related.  Rather, they are a mix of gluten based products (most often from a GMO strand) and preservatives including MSG.  Blech…

Last night, after some tinkering, we concocted a delicious homemade taco seasoning.  The best part about making your own seasoning, is that you are able to tweak the proportions to taste…  My tongue is often overly sensitive to spice so for this recipe, we chose a chili powder that is mild-medium.  If you like something with kick, you could easily choose a hotter chili powder and increase the amount of red pepper.  Whatever, you do, enjoy playing with your food!

taco seasoningHomemade Taco Seasoning 

½ Cup Chili Powder

2 TBS + 2 tsp Ground Cumin

2 TBS + 2 tsp Garlic Powder

1 TBS + 1 tsp Oregano

1 TBS + 1 tsp Onion Powder

2 tsp Kosher Salt

2 tsp Black Pepper

2 tsp Crushed Red Pepper

2 TBS + 2 tsp Dried Onion Flakes

*Mix all ingredients together in a glass bowl.  We are storing ours in our old taco seasoning bottle… We were super excited to dump out its original contents and replace it with something we could eat without worry.


ENJOY!

Posted in Around the House, Cooking, Philosophy, Recipes | Tagged , , , , , | 1 Comment

Sourdough…. The Kitchen Staple You Shouldn’t Be Living Without

One of the things I get asked about most is my sourdough start.  I actually have to giggle a little when people think it is amazing to make your own bread.  Don’t get me wrong, there are some talented bread artisans out there, who do some incredible things with dough… However, to just get a simple loaf of sourdough bread is much easier than you may think.

Benefits of making your own bread:

-You can make as much as you want, whenever you want.

-You have control over the quality of your ingredients….

-It actually goes bad… This may not sound like a benefit, but is anyone else disturbed by the fact that some store bough bread NEVER molds?!?!?

-You can make loaves that fit your meal.

Benefits to maintaining a sourdough start:

-You never have to wait for yeast to activate.

-You get to make new friends when you give away the portions of your start that you no longer need.

-While this blog focuses on bread, there are SO many other things you can make with your start… Creativity can flow…

The first thing you will need is to acquire a sourdough start.  You can order them off of Amazon, ask a friend, or go to your local bakery. After that, you are off….  Maintaining a sourdough start really falls into three basic categories. 1) Getting your starter going. 2) Feeding your starter. 3) Using your sourdough.


Sourdough Starter

1)      Add ¼ C lukewarm water to starter in jar.  Stir to dislodge the starter.  Stir to combine.  Pour in to a large glass bowl.

2)      Add 1 ¼ C lukewarm water and 2C flour to the bowl with the starter.  Mix until combined.

3)      Cover bowl with plastic wrap and let sit at room temperature (aprox 70 degrees) for 8-12 hours.

4)      After 8-12 hours the starter will bubbly.

5)      Stir the starter and discard 1 ½ C.  Mix in ¾ C lukewarm water and 1C flour.

6)      The starter should be fairly thick. Similar to pancake batter.

7)      Recover the bowl and let sit at room temperature for another 2-4hours.

8)      Stir the starter and discard 1 ½ C.

9)      Feed the remaining starter ¾ C lukewarm water and 1C flour. (batter will be thick and lumpy)

10)   Cover and let rest at room temperature for 2-4hours.

11)   Stir starter down and place in stoneware or glass container.  Cover loosely with a lid or plastic. (The shower cap style dish covers work well) If you use a screw top  do not fully screw it on.

12)   Keep in refrigerator until you are ready to use.

Feeding your Starter

Note: Feed starter once a week.  However you may let it sit for longer.  If you let it sit for a month it might have a yellowish layer on top. (Do not use if there is a layer of pink or black)

1)      Stir your starter.  Mixing any liquid completely into starter.

2)      Keep stirring until smooth.  Discard 1C of starter. (You may also give away this Cup of starter)

3)      Add 1C lukewarm water and 1C flour.

4)      Stir until smooth.

5)      Refrigerate. (no need to let it sit)

Using your Starter

1)      Up to 12 hours before beginning your recipe, stir the starter and discard or give away 1C of your starter.

2)      Feed remaining starter 1C lukewarm water and 1C flour.

3)      Let it sit (loosely covered) at room temperature for 4-12 hours. (the longer you choose to let it sit the more “sour” it should be) *This is your fed starter and ready for use in any sourdough recipe.

4)      Once you have removed however much starter your recipe calls for (usually 1C) feed the remaining starter 1C lukewarm water and 1C flour.  Let sit loosely covered at room temperature for 2-4 hours.  Stir down and return to refrigerator.

Easy Rustic Sourdough Bread

sourdough bread1 Cup “fed” sourdough starter

1 ½ Cups lukewarm water

2 tsp. instant yeast

1 Tbs. sugar

2 ½ teaspoons salt

5 Cups all-purpose flour


1)      Combine all of the ingredients, kneading to form a smooth dough. (Depending the wetness of your starter, you may need more or less flour… so I only add a little at a time.)

2)      Allow the dough to rise in a covered bowl until it has doubled in size. (about 90min)

3)      Coat hands in flour.

4)      Gently divide dough in half. (it may deflate a little)

5)      Gently shape the dough into two oval loaves and place on a lightly greased baking sheet. (or in to greased and floured bread pans.)

6)      Cover and let rise until very puffy. (about one hour)

7)      Preheat oven to 425

8)      Spray loaves with lukewarm water (Or egg wash) and make a couple fairly deep slashes in each loaf with a sharp knife.

9)      Bake for 25-30 minutes until a deep golden brown.

10)   If baked in bread pans, remove to cooling rack immediately after removing from oven.

Do you have questions or tips to share with our readers? Please make sure you share them in the comments below….

Posted in Around the House, Cooking, Recipes | Tagged , , , , , , | Leave a comment

You are what you put in your coffee. OR How to make your own coffee creamer.

Milk, cream, and vanilla…. OR Corn syrup solids, vegetable oil, sodium caseinate, dipotassium phosphate, mono- and diglycerides, sodium aluminosilicate, artificial flavor, annatto color [etc]…

What would you rather put in your coffee?

The older I get, the more aware I become of the things I put in my body.  It is amazing the things that we use without even thinking. I have used name brand coffee creamers for years.  It never once crossed my mind that this second list of ingredients is what I was putting in my body.  I am fairly sure that I was somehow convinced that it was the first list that I was consuming.

Now I will admit that it does take an extra two minutes every few cups of coffee to make my own creamer, but once you taste this bit of liquid heaven, you won’t mind spending a few minutes… even in a groggy state… mixing together this yummy treat.Image

All you need is:

14oz Organic half & half

14oz Sweetened Condensed milk

2 tsp High quality pure vanilla extract

-Mix ingredients together.

-Store in a glass jar in the refrigerator.

*We have also started experimenting with other extracts, but so far the vanilla is our favorite. Coming soon I will be happy to share our experiment in extracting our own mint.  If that works like we hope, it might be an awesome option for this recipe. J

*For those of you concerned about the caloric intake of this scrumptiousness, it should be noted that the original version of a major coffee creamer brand contains 30calories per Tablespoon… this is more than a tablespoon of half-n-half…plus it is calories from the above mentioned “ingredients.”

(On a side note, it has been entertaining to me that several of the major coffee creamers have now come out with a “natural” version of their creamers…. It’s like they know we have caught on.)

After you have enjoyed this super yummy treat and have experimented with flavors yourself, make sure to comment and let us know what your favorite combos were.

Posted in Around the House, Canning/Preserving, Cooking, Projects, Recipes | Tagged , , , , , , | 6 Comments

Marinara: A Multi-Purpose Sauce (Or the story of the tomato vines hanging in my house)

vines in greenhouseLast year we made our own marinara from tomatoes we purchased.  (We didn’t grow enough to do our own.) It wound up being one of our favorite things we had in our cupboard for the winter.  So, this year we decided to grow enough tomatoes to be able to use our own GMO free heirloom tomatoes.

All was going according to plan until we started to get regular, early fall freezes.  We live at about a mile high in the mountains of Idaho, so we were prepared to care for our garden in cooler temps, but after several days of adding heaters to our greenhouse, it became apparent that more drastic measures were needed.

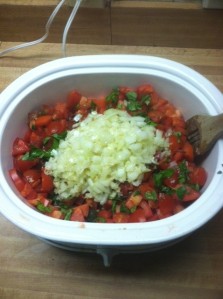
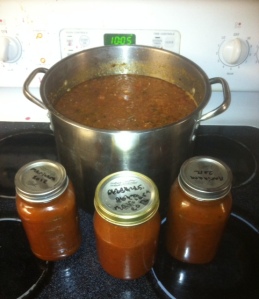
vines in houseWe pulled our plants out of the ground and took the vines that were loaded with tomatoes and strung them from wire inside of our house.  Gradually the tomatoes began to ripen.  As they did we started to cook batches of sauce in our crock pot. (It takes about 3 crock pot batches to fill our stock pot. And about one stock pot full makes for a full pressure canner)

Our “recipe” is as follows: (all measurements are approximate and we do a lot of our cooking by taste and appearance)


12 C cubed tomatoes (we leave the skins and seeds intact for the nutritional benefits)

¼ C fresh basil

¼ C fresh oregano

2 TBS fresh thyme

*Note: you can use dried herbs but you will want to add them at the very end of the cooking process.

10 cloves of garlic

1 ½ C chopped onion

¼ C olive oil

2 TBS organic cane sugar

2 tsp kosher salt

2 TBS organic no salt seasoning

sauce in crock pot1)      Place tomatoes and fresh herbs in a crock pot set on high. (Add citric acid according to directions on package.)

2)      Saute onions and garlic in oil on stove. (Don’t leave on heat too long.  You don’t want the onions to clarify.) Then add to the crock pot.  Mix together.

3)      Let cook for about 1hr on high then turn heat to low. Cook for 8hrs on low. (We usually let it cook while we sleep)

4)      Store in fridge while you cook the additional batches of sauce. (All batches need to be completed in 5 days or less)

5)      Put batches in stock pot add any dried herbs and heat to a boil. (leave lid off to help thicken)

sauce on stove and in jars6)      Use a hand blender to get sauce to desired texture.  (we like to leave it a bit chunky.)

7)      Follow directions for your canner. (We use an All American Pressure Canner 13lbs of pressure for 15 min, but remember these levels are specific to your altitude.)

*Note: When you are ready to use your sauce, you can add a can of organic tomato paste to thicken it for spaghetti sauce or a can of water to thin it out for minestrone soup.

Enjoy!

Posted in Canning/Preserving, Cooking, Gardening, On the Farm, Projects, Recipes | Tagged , , , , , , , , , , | Leave a comment

Bringing the Bistro to Your Kitchen… (and other tips on using preserved food)

Note: It would be very easy for me to skip this blog as it won’t be easy for me to write.  While I consider myself a decent baker and could give you recipes all day long, cooking is something I do instinctually.  How do I tell you to measure something until the texture or smell is “right?”  So, I will do my best on this blog.  If you have questions, please ask, because I can help walk you through anything that isn’t clear. ENJOY!

One of the questions that was asked of me recently, is “how do you use the things you store? Do you have specific recipes in mind when you begin your food preserving?”  The most direct answer is NO.  I suppose I could make menus for a year and plan that way, but I feel like I might get bored.  Rather, we do our preserving based on broad strokes of cooking.  For example, we have chosen to NOT make a marinara sauce, rather we make a tomato base that can be thickened for marinara or added to for soup.  This method allows us to put up fewer types of things, and more of one thing that can be altered later.  Another thing we have canned this way is crushed tomatoes.  Rather than choosing to can a sweet crushed tomato or an Italian style crushed tomato, we have made the choice to season in such a way that we can add more of something later to have them function either way.

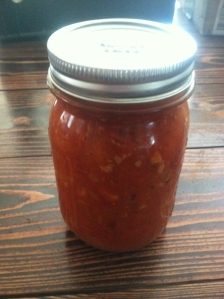
One Pint Multipurpose Crushed Tomatoes- Canned 9/2012

One Pint Multipurpose Crushed Tomatoes- Canned 9/2012

This afternoon I was looking for something easy to make for lunch.  I wanted to use what we had on hand to avoid spending money and I wanted to spend as little time in the kitchen as I could to avoid the heat. Thus the creation of a new recipe… Let’s call it “Creamy Tomato Fettuccine”

1)      In a large pan with high sides (a chicken fryer will do) add about a 1/8C olive oil, 2 TBS Butter, 1/4C Red wine (Whatever you have on hand will work but I think a dryer wine would be better than a sweet), 1 ½ TBS Minced Garlic, and Half of a white onion. (OR about 2 TBS of dried onion.)

2)      On medium heat cook until onion and garlic has clarified.

    3)      Add 1pt of crushed tomatoes, One 6oz can of organic tomato paste.

    4)      Cook until ingredients are visibly combined.

    5)      Add seasoning to taste. (I added fresh Greek oregano and thyme from my garden.)

    6)      Add one small green bell pepper that has been diced.

    7)      Cook until the pepper just begins to soften but is still a bit crisp.

    8)      Remove from heat for about 2 minutes.

    9)      On top of the sauce add ½C mozzarella. (Make sure the cheese is in a pile in the middle of the sauce. DO NOT STIR.)

    10)   On top of the cheese, pour 1C half and half (or cream if you’re feeling particularly decadent.) Note: Pouring the cream over the cheese helps to temper it so that it will not curdle.)

    11)   Gently mix all ingredients together while off of the heat.

    12)   Return to low heat.

Final, yummy, product... You will think you are in the local Bistro. ;)

Final, yummy, product… You will think you are in the local Bistro. 😉

13)   Add hot, cooked fettuccine to the sauce and mix together. (this should be enough to melt the remaining cheese but if not go ahead and heat just a bit longer.)

14)   Serve in a bowl with fresh basil.

In my husband’s opinion the combination of flavors was well balanced.  The wine brings out the acidity of the tomatoes, leaving the dish with a delightful “twang.”

Posted in Around the House, Canning/Preserving, Cooking, Recipes | Tagged , , , , , , , | Leave a comment

You “bug” me… (aka: how to control that ant problem)

The first rule of blogging…. “Do not neglect your blog.”  Ugh!  While I am generally a rule follower, this is a rule I tend to break too many times.  I am sure I could make an excuse that would sound good, but to remain honest I must admit that I have just avoided writing for close to a year.  However, I recently spoke to a group of women about simple living and I was asked so many questions, I had to promise to update my blog to answer some of them.

Summer 2013 is in full swing in the mountains of Idaho.  While the summer started off cold, (freezing all of the pie cherries *cry*) the end of June and all of July has been HOT!  Our garden is growing and we have found relief from the heat swimming in the river.

With the heat has come a myriad of bugs.  Some of which we have needed to control and others that are beneficial to our garden.  One of the common questions we get is; “How do you control pests without compromising your natural growing methods?”  The answer is often about finding a balance in the food chain… eg; introducing bugs as predators to those pests that would eat your plants etc.  But, once in awhile, it is time to just get rid of pests.  Our pests this spring and early summer were ants in every shape and size.

With the late freeze we found our 100yo home infested with these pesky creatures.  They of course found it necessary to seek shelter in my kitchen and pantry and living room and…. Well you get the picture.  Pesticides just aren’t an option for us .  So we needed an answer that would solve our problem without compromising our health or the health of our animals.

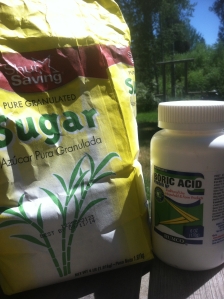
Enter stage right…. Boric acid.  Boric acid is a weak acid of boron and an effective insecticide.  When an ant eats the boric acid, it stays alive long enough to share the boric acid with its colony, and POOF the whole colony is gone!

The trap cAnt trap basicsonsists of 3 basic parts:

1)      The bait— SUGAR

2)      The host— a cotton ball

3)      The poison—boric acid

Mix 2 tablespoons of sugar with ½ teaspoon of boric acid and 1 tablespoon of water.  Soak a cotton ball or two in the mixture and place on a shallow plate or lid.  Place your plate in the path of the ants.  Finally gently grab one of the ants and place it on a dry part of the plate.  The ant will begin to eat what he thinks is sugar.  He communicates this with the other workers and before you know it, your cotton ball will be covered with ants.  You may need to reset your bait after a couple of days but in less than a week you should notice a reduction in your problem.

*IMPORTANT NOTE: Place traps out of the way of children and household pets.  Boric acid causes the ant’s body to no longer metabolize water, thus killing them.  You can imagine that it could cause problems if ingested by a friendly creature.

We placed our traps in May and all of our ants were gone and have remained out of the house since.  I will take it.

Our next experiment…. Mosquito traps… I will keep you posted.

Posted in Around the House, Pest Control, Projects | Tagged , , , , , , | 1 Comment

It’s a Huckleberry Kind of Love

I have had this blog sitting on my desktop for a couple weeks and I decided I had better get it finished up and posted.

We are just winding up our huckleberry season in Idaho.  So in honor of the tangy little berry, this post will be all things huckleberries, including my recipe for huckleberry pie.

A couple weeks ago, our sweet niece came for a visit.  Last year she was here when we were doing a ton of fishing for lake trout, however she came a bit later in the summer this year, so we were able to take her huckleberry picking with us.  At first she wasn’t sure about tromping around in the woods, but she quickly discovered that the bounty was worth the journey.  In fact, I am fairly certain she ate close to a half gallon of huckleberries.

I don’t remember a year growing up that we didn’t have huckleberries.  In fact when we didn’t pick them, Mom always bought them so that we could serve huckleberry pancakes and sauce to our bed and breakfast guests.  They were always present in our freezer.  The one thing we never ate as children was huckleberry pies.  The berries were just too expensive and rare and we had many guests that we wanted to share them with.  So this year when Seth’s Dad asked me to make him a pie from the precious fruit I was excited to tackle the challenge.

I used a recipe I had found for blackberry pie that I have used several times for a mixed raspberry/blackberry pie.  It was super easy and yummy so I thought I would give it a shot with the huckleberries.

The recipe is as follows:

  • Prepare a pie crust for a single crust pie. (You can do this however you like best, but I will be posting eventually on several different options.)
  • Preheat oven to 400
  • Gather your ingredients for the filling.
    • 4 cups berries (fresh or frozen) Note: If you are using frozen berries, thaw and drain off liquid before using.
    • 2 eggs, lightly beaten.
    • 1/3 C. Sugar* (see my post on using organic cane sugar in baking)
    • 4 TBS Flour
    • ¼ tsp Salt
    • 1 tsp Pure Vanilla Extract
    • 1 C. heavy cream
    • In a large bowl, combine eggs, sugar, flour, salt, vanilla extract, and cream.
    • Add a layer of berries to the bottom of uncooked pie pastry.
    • Pour some of the egg mixture over the berries.
    • Alternate berries and egg mixture until all is used. *
    • Bake for 30-40 minutes until the crust is nicely browned and the filling is set.  Remove from oven and let cool slightly.*

*NOTES:

1) The amount of sugar in this recipe is sufficient for my mixed berry or blackberry pies, but my honey’s grandpa felt the huckleberry pie was a bit too tart.  Thus, for the second huckleberry pie I made, I tossed the berries in a bit of sugar (until coated) before adding them to the pie pastry and adding the egg mixture.

2) The first time I used this recipe I dumped all 4 cups of berries into the crust and then poured the egg mixture over it.  I found that it didn’t have a uniform texture when it was done.  Alternating the berries with the egg mixture fixed this problem.

3) In my opinion the pie is best slightly warm served with ice cream on top.  However, the warmer the pie, the less it will hold together.  If you want the pie to hold together for presentation, cool the pie overnight in the refrigerator before cutting.

Beware… As our littlest nice will tell you, those huckleberries are hard to stop eating, and if you think the little berry is hard to put down… imagine it in this scrumptious pie.

Posted in Adventures, Cooking, Projects | Tagged , , , , , , | Leave a comment

Let’s Get Philosophical

One of the things I think I get asked about the most is the balance between simple living and inexpensive living.  For most people, one of the main things that drive them to a simple life is a desire to save money.  While there are many things about simple living that may save you money, I would like to challenge each of you to read this blog through a different lens… or perhaps lenses….

Lens #1 Saving money….

Much of what you pay for when purchasing items from the store is the packaging.  When you reduce the packaging you purchase, you will also reduce your overall expenses. So, make from scratch anything you can think of.

Example: Make your own laundry soap… The supplies you buy will produce many batches of soap.  Thus you will have much less waste. (On a side note, you are also reducing toxins and additives that you typically find in store bought soap.  Who needs fillers??)

Example: Make your own bread…  Not only will your ingredients last you for many, many many batches, but you can also use things like your leftover oatmeal in your next batch of bread.  Extending your resources and using your leftovers. (I will link to a recipe when I have a chance to post it.)

Lens #2 Knowing where your food comes from…

There has been a huge movement to get people more involved in knowing what is in the food they are eating.  Think for just one moment… Do you know what your food is eating?  Do you know what has been put in or on your food in the name of controlling pests or disease?  Even the best labels rarely tell us about the process that went into raising your food.

Simple container garden made from reclaimed materials.

Solution: Raise some of your own food.  Even in the smallest of spaces you can grow a container garden. If you are lucky enough to have a large outdoor space you can not only have a garden but possibly raise some of your own meat and eggs.

Solution: Buy locally.  In most communities, you can find local markets and farmers markets.  These markets allow you to come face to face with the grower and ask questions about where and how the food was raised.  Also, ask around… you might be surprised how many of your friends are buying local beef, chickens, milk, and eggs. (Remember, buying a whole beef may seem expensive up front, but when you calculate the cost out, you will often save money overall.)

Lens #3 A change of priorities…

My husband and I often laugh because most months we spend more money on food for our chickens than we do for ourselves.  Just yesterday we purchased organic yogurt to feed to our chickens, (This is a great, natural solution to chickens with diarrhea.) and the things we purchased for ourselves were less than half the overall cost. But hey, when you are raising your food with love you have to treat it with great care.

Trade off: Several months back, we found an AMAZING chicken food produced by Scratch and Peck.  It is amazing for many reasons, including it is certified GMO free.  Because the testing for GMO’s is expensive, this food is more expensive than most, but we know that without a doubt it is free of any of those things that concern us. However, purchasing this food means that we gave up a summer vacation and we don’t go out to eat as often.  While sometimes we sit and wish we had more “mad money” to spend on ourselves, we are reminded that we have the option of spending less on what we put into our bodies but then we may just be spending that money later to make up for it in medical bills… We would rather opt for proactive health than reactive health.

Even in the high mountains of Idaho, we have managed to have a little garden.

Trade off: We live out in the middle of nowhere and have our own garden and chickens… However, this means that much of our spare time is spent working around the “farm.” For us, it is a trade off we don’t mind.  The thing that has been a little more difficult is helping others understand our priorities.  By no means do we feel our lifestyle is superior to anyone else’s, it is just different and eats up our time.  (PS- If you are one of those who feels we have fallen off the face of the earth, let me issue an invitation… you are always welcome to come hang out with us… The good news is that my mommy always taught me to feed my guests well… )

I hope this LONG post helps those of you who are working toward a new life philosophy.  If you have questions or need help, know that we are always available to answer what we can.  This is a lifestyle, a journey, an adventure….

Posted in Around the House, Gardening, On the Farm, Philosophy, Who We Are | Tagged , , , , , , | 8 Comments

A Cherry on Top

The basics to the pie filling.

It is cherry pie time of the year again.  Last weekend my honey and I made our annual trip to pick pie cherries.  Since cherry pie is one of my father-in-law’s favorite, we picked extra this year so that I can keep him in cherry pie for the next year.

This year our haul was 28lbs at .75/pound, thanks to Kelly Orchards.

While this blog was intended to be about the pie filling, (and I will talk about that too) much of this blog will also be about how our transition to organic cane sugar changed the process.

My recipe for cherry pie filling is an easy one….

This is our handy dandy cherry stoner. It makes removing the pits SO much easier.

1)      Remove the pits from your pie cherries. (Tart cherries not sweet ones)

2)      Separate the pitted cherries from their juices.

3)      In a large pan, combine 1.5C sugar with 2/3C corn starch a dash of salt and 2C of the cherry juices.

4)      Over medium heat (stirring with a wooden spoon the whole time) let the sugar mixture come to a slow boil. As it begins to boil it will thicken.  When this happens let bubble and thicken for one more minute.

5)      Remove from the heat add 2Tbs of butter, 1.5 additional C sugar, 8C cherries, and 8 drops almond extract. (Mix all of this together.)

Here they are, already for the freezer.

6)      Separate into two equal pie fillings. (You can either use them immediately to make 2 cherry pies, or put them in bags for storage in the freezer.)

Last year we made our filling with regular white sugar (made from sugar beets.) The sauce thickened just as I expected it would.  This year, I had a small amount of beet sugar left, so I made my first batch of pie fillings with that.  However, my second batch I made with my brand new bag of Fair Trade Wholesome Sweeteners Organic Sugar made from Evaporated Cane Juice.  I was so excited to use my new treasure in my cooking.  However I had an outcome I wasn’t expecting… The sauce never thickened.  I even added some extra corn starch.  I was SO bummed.

I decided to try a similar recipe that used a slightly different process… still not thick.  WHAT IN THE WORLD?

I researched, several websites and still couldn’t find an answer.  Finally my Facebook friends and my friends at GMO free Idaho came up with some great, potential solutions.  First it was suggested that I try a different thickening agent (tapioca etc.).  Second, someone mentioned that corn starch tends to damage at too high of a heat… (hmm now we may be on to something.) Third, a few people mentioned that the texture of the sugar might just be too different, and maybe I should try putting it in my food processor and changing the texture.

Sure enough, after pulverizing the sugar a bit I was able to get it to a texture that would dissolve at a lower temperature before ruining the corn starch.  WAHLAH…  it thickened so much better.  (Still not quite as thick as the beet sugar, but plenty thick.)  On a side note,  I think I will use a small amount of fine texture tapioca to thicken the pies that didn’t thicken as well when I cook them.

Posted in Around the House, Canning/Preserving, Cooking, Projects | Tagged , , , , , , , , , | 6 Comments

The Fruits of Our Labor

I will warn you… This post is not for the faint of heart or stomach.

Several weeks back we purchased our first batch of chicks.  I was so excited to bring our little balls of fluff home.  Over the weeks we watched them grow and change and become big healthy chickens.  It was our goal from the beginning to raise them in such a way that the meat would be as healthy as possible.

One of our primary concerns has become the influx of genetically modified  [GM] crops that have become not only a part of our food supply but also the food supply for the food that we raise.  I won’t go in to detail on the specifics of those concerns at this time… (maybe in a later post), but we did make the decision to avoid GM food for our chickens.  After much searching we only found one company who could guarantee the content of their food to be GMO free; Scratch and Peck Feeds out of Bellingham Washington.  While these feeds are more expensive (due to the price of the testing for GM crops), we found the quality to be impeccable.  Our chickens have so enjoyed their food, that the few times we have tried to feed them bread that contained GM ingredients, they wouldn’t even touch it.

Butchering day was an exciting one for us.  We could hardly wait to see the fruits of our labor.  Seth’s dad, grandpa, cousin Juan, and Drew came to help and we couldn’t have done it with out them.

Our little set-up included a propane burner with a large pot for boiling water, three traffic cones upside down on saw horses, a chicken plucker, a table covered with plastic for cleaning, and coolers filled with ice.

As with all large projects, it was all about getting a rhythm to the process.

First the chickens were put into the cones head down.  In doing this the blood runs to the chicken’s heads and they become very calm.  Then each of them have their necks cut so the blood drains out.  It is an amazing and humane process… No chickens running around without heads… No unneeded trauma.

Next the chickens go into the boiling water for 15-30 seconds.  This helps to make it easier to remove the feathers.

Here is a view of the inside of the plucker for those of you who have been asking.

This was the coolest part of the whole process.  When butchering chickens, many people dread the removal of the feathers.  However, this handy dandy chicken plucker made the whole thing only take about 10 seconds per bird… SO WONDERFUL…

After the chicken were featherless, it was time for a cleanup and a trim out… Seth’s dad was SO fast at this.

Finally it is into an ice bath to drop the temperature of the bird before packing for the freezer.  (I have something cool to share on chicken packaging too… but it is SO cool that it is going to get its own post… stay tuned)

The whole process only took us about an hour and a half for 27 birds.  Pretty amazing.  I am even looking forward to our second batch of birds we have to butcher in a few more weeks.

The night of butchering I made yummy chicken tacos.  I wanted to make something that made us think of the tacos we had in Mexico, and I think I did a fairly good job.  They were so super yummy.  The chicken meat was rich and tender, better than anything I have ever had from the store.

Now it is time to wait on our laying hens to give us eggs and our garden to be ready to harvest on a large scale… (we have already taken a few tomatoes)  There is much to do, but while we stay busy, our life still remains simple…

Note: If you are super interested in this process and would like to see an unedited video, you can find it here.  Just remember… you will be watching the things that happen on a farm.

Posted in On the Farm | Tagged , , , , , , | 2 Comments